Showing posts with label Rakennustyömaa. Show all posts

Thursday, March 3, 2016

Nukkekoti veljentytölle - A dollhouse for my niece


Edellisestä postauksestani on päivälleen vuosi! Mihin tää aika menee... Ihan joutilaana en ole minirintamalla ollut. Suurin projekti oli sisustaa nukkekoti 5-vuotiaalle veljentytölleni. Kunnianhimoinen ensiyritykseni oli tehdä nukkekoti itse, mutta kuten mun askareissani tuppaa käymään, hieno ideani osottautui liian mutkikkaaksi mun taidoilleni. Kun ryhdyin kokoamaan sahattuja osia, totesin ettei siitä tulisi mitään. Osat on tallessa, josko vielä joskus...

Seuraavaksi ajattelin muokata yhtä jo olemassa olevaa nukkekotiani, mutta siihen piti tehdä koko julkisivu uusiksi enkä saanut sitä tarpeeksi nätiksi, joten sekin yritys tyssäsi alkutekijöihinsä. Lopulta pääin uhrata pikkulikalle hienoimman omista nukkekodeistani, jonka julkisivua en edes yrittänyt muuttaa vaan tyydyin sisäpintojen laittoon.

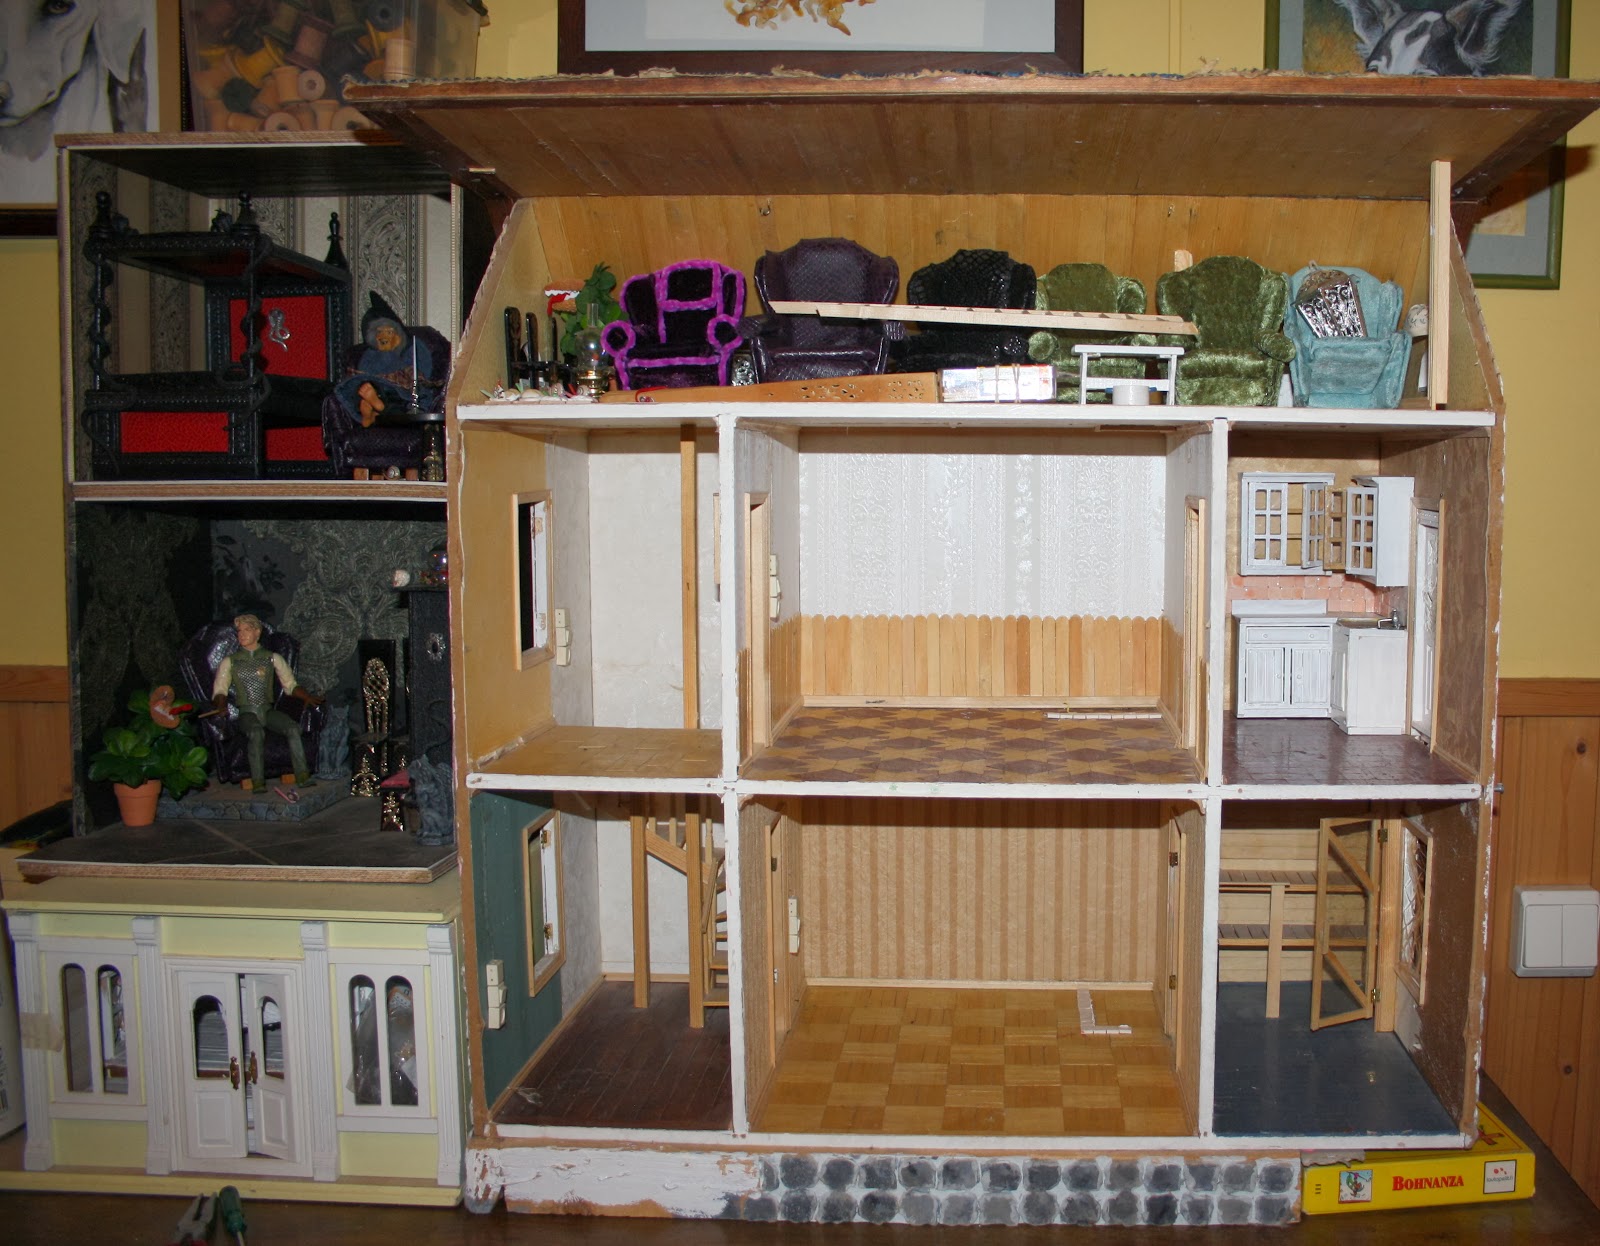
Valmis kokonaisuus alla - yritin pitkään mallata erilaisia jotain yhtenäistä tapettia nukkekodin ovien sisäpuolelle (huoneitten tapetit eivät riittäneet niihin), mutten millään löytänyt sopivaa, joten maalasin ovien sisäpuolet valkoisiksi. Lahoituspäivää edeltävänä iltana innostuin maalaamaan ne pinkeiksi, otesin että väri vei silmää liikaa pois itse huoneista ja maalasin ne taas valkoisiksi... Tämä on "prosessini" ja syy miksen ikinä saa mitään valmiiksi :D Tulos ei miltei koskaan tunnu olevan mieleeni!

It's been a year, to the day, since my last post! I don't know where the time has gone. I haven't given up on minis. The biggest project of the year was to make a dollhouse for my 5 year old niece. My ambitious first idea was to make it from scratch, but as so often happens with my crafts, my idea was too convoluted for my skills. When I started putting the pieces together I completely lost faith. I have the pieces in my stash, maybe some day...

Next I thought I would redo a dollhouse I already had, but I couldn't get the facade nice enough, so I scratched that too. Finally I decided to just give her one of my own dollhouses, the nicest I had, and didn't touch the facade but instead just did the inside.

The finished result can be seen below - I tried all sorts of wallpapers for the dollhouse doors (since I didn't have enough of the rooms' wallpapers to continue those on the doors to the dollhouse) but nothing seemed right, so I just painted them white. The night before I gave the gift I suddenly decided to paint them pink, then promptly decided it was all wrong and drew the eye away from the rooms themselves, and painted them white again... This is my "process" and the reason I never finish anything :D I'm rarely happy with the result!


Otin hyvin vähän kuvia rakennustyöstä, mutta alla ullakko sellaisena kuin se oli. Tein siihen foam coresta (mikä se on suomeksi?) väliseinän ja siihen oviaukon ja oven, siitä tuli yllättävän hyvä.

I took very little pics of the work in progress, but here's the attic as it was. I made a dividing wall out of foam core and set a door in it and I'm pretty happy with the way it turned out.


Talon kaikki listat (mukaanlukien ikkunat ja ullakon ovi) ovat sellasista bambuisista ruokailualustoista ja puupätkistä. Ullakolla on siis nyt kaksi huonetta:

Bamboo place mats and the like provided the lumber for most of the wood seen in the house. So, the Attic now has two rooms:


Toisen kerroksen makkariin halusin tehdä maalatun puulattian. Piirsin osittain sabluuna käyytäen Bilteman sytykkeisiin toistuvan kuvion vedenkestävällä tussilla, sitten lakkasin laudat ja malasin ne vedellä sekotetulla valkosella akryylimaalilla ja lakkasin vielä kerran. Sitten liimasin laudat yksitellen paikoilleen kontakiliimalla. Oon oikein tyytyväinen lopputulokseen :)

I wanted a painted plank floor for the bedroom on the second floor. I used a partial stencil to draw a repeating pattern in permanent ink on the wood I used as floorboards. I varnished them, painted them with a white wash of water and white acrylic paint and varnished them again, then glued the floorboards in place with contact glue. I'm very happy with the result :)


Muiden huoneiden lattiat ovatkin sitten tylsästi muovimattoa, koska halusin lapsen leikittävään nukkekotiin jotain suht helppohoitoista ja kestävää. Mieluiten olisin tehnyt kaikki lattiat puusta mutta mun tahdillani talo ois siinä tapauksessa hädin tuskin valmistunu pikkuneidin lakkiaisin mennessä ;)

The floors in the other rooms is just boring plastic carpet glued in place. I wanted something hard wearing and easily cleaned for a little girl's play house, plus if I'd gone for wooden floors in all the rooms the house would barely have been finished by the time she graduates from collage ;)


Tapetit ovat osin 1:1 tapetteja, osin ihan nukkiksiin tarkotettuja. Keittiön seinissä on boordi ylhäälä ja dc-fixiä alhaalla.

The wallpapers are partly 1:1, partly expressly for dollhouses. The kitchen has a wallpaper runner on top and dc-fix on the bottom.


Salongin katto on 1:1 anaglyptaa.

The hall/salon ceiling is 1:1 anaglypta.


Tuesday, February 11, 2014

Olisipa kunnon työkalut! - Oh to have proper tools!

Do dii, pubiinhan tarvitaan baaritiski ja aattelin että oivallisin toteutus olisi tehdä sellanen ison huoneen ja "keittiön" väliin. Tuosta sitten siis osa seinää pois. Joopa joo, helppoa kuin heinänteko ;)

Obviously the pub needs a bar and I decided the best way to make that work is to remove part of the wall between the larger room and the "kitchen". Right... easy peasy ;)


Voin kertoa, että kun työkaluina on pelkät puukot, tommosen aukon tekeminen kestää näillä kätösillä hieman yli 5 tuntia :D Että sellasta oon tänään puuhastellut :D

I can tell you that making an opening like that using only knives takes a little over 5 hours, at least with these hands :D So this is what I've been doing today :D


Ollappa varaa Dremeliin!

I wish I could afford a Dremel!


Riisuttu malli - The stripped version


Ihastelua ja angstia - Admiration and angst

Tässä uutukainen taloni (ignooratkaa tossa sivussa näkyvät rakennukset). Pläjäytin sen paraatipaikalle olkkariin ja tuijottelin sitä pohdiskellen pari päivää, kunnes päätin, että siitä tulee oiva pubi Bowtruckle Pinesin velhokylään. Se sai nimen The Troll & Trollop.

Se kuitenkin tarkottaa sitä, että on tarpeen tehdä siihen joitakin radikaaleja muutoksia... ja kylläpä tuntuu kamalalta tarttua sellaseen toimeen, kun ei alkuperäsessäkään oo vikaa, vaan se on itseasiassa upeasti tehty talo johon on selkeesti uponnut monen monituista työtuntia. Kesti pari viikkoa kerätä rohkeutta remonttiin, se tuntuu suorastaan pyhäinhäväistykseltä!

This is my new house (ignore the ones to the side of it). I put it n a prominent place in the living room and sat pondering it for a couple of days until I decided that it would make a great pub for the wizarding community of Bowtruckle Pines. I christened it The Troll & Trollop.

This all means, however, that some drastic renovations are called for... and boy is it difficult to do that when the house is one that someone has already poured a lot of work and love into - and very well too! It took a couple of weeks for me to work up the courage to begin a renovation that feels a bit sacrilegious!


Ensitöikseni irrotin sähkövehkeet. Lattiat ovat UPEAT ja onneksi ne istuu ihan hyvin velhomaiseen pubirakennukseenkin, joten ne saavat olla nykykuosissaan :) Mä oon NIIN onnellinen että voin näin säästää osan alkuperäsen omistajan tekemästä työstä!

First I carefully removed the electrical stuff. he floors are GORGEOUS and thank goodness they work well in a wizards' pub too, so they can remain as they are :) I'm SO happy to be able to retain some of the original owner's work!


Joissakin huoneissa oli rakenteisiin tiukasti liimattuja kaappeja/rakennelmia, jotka yritin irrottaa mahdollisimman ehjinä, joten työskentelin hitaasti ja varovasti. Mm. eteisen rappuset olivat tosi hienot. Ne jouduin irrottamaan osissa, toivon vaan, että osaan laittaa ne takasin kun oon saanut seinät ja katon valmiiksi.

Some rooms had very tightly glued cabinets/structures, that I tried to pry loose very slowly and carefully, to keep them from breaking in the process. The stairs for example were really nice. I had to remove them in sections, I just hope I can put them back together once I've finished redoing the walls and ceiling.


Tässä huoneessa oli aiemmassa postauksessa näkynyt rapattu takka, jonka irrotin ja otin talteen - kuvan ottamisen jälkeen sain poistettua noi siitä jääneet kaakelitkin.

This room had the stuccoed fireplace I showed you in my previous post - I removed it for safekeeping and pried off those remaining tiles too after taking this pic.


Tässä pikkuhuoneessa oli niin taidokkaasti tehty sauna, että sydäntä riipi ottaa se pois - en vaan mitenkään saanut sitä sovitettua suunnitelmiini! Onneksi sain kovan huhkimisen jälkeen sen melko ehjänä pois, joten voin uusiokäyttää sen toisessa projektissa.

This little room had a sauna so skillfully made that it was heart wrenching to remove it - I just couldn't see it in the pub. Luckily I eventually managed to get it loose pretty much intact, so I can reuse it somewhere else.


Keittiöstä irrotin kaapistot ja kaakelit tulevaa käyttöä varten.

I removed the kitchen cabinets and the tiles for future use.


Ikkunalasit oli tehty liivatelevyjä koristamalla - sievät, mutta ne oli jo vääntyneet aika pahasti. Ajattelin tehdä vastaavat jostain muusta materiaalista :)

The window panes had been made by scoring gelatine - very pretty, but they'd gotten pretty twisted. I'll make similar ones from another material :)


Sunday, March 3, 2013

Downsia tuhoamassa - Demolishing the Downs

Oon yrittänyt purkaa Dobby Downsia, tän enempää en onnistunut. Onko kellään vinkkiä miten nuo tapetinjämät saisi pois? Edellinen omistaja on siis tapetoinut seinät ja lattiat, lieneekö käyttänyt kontaktiliimaa kun eivät millään meinaa irota. Luulen että toi runko on liimattu kokoon sillä samalla, sillä nämä osat ei irtoa toisistaan. Ideoita?

I've been trying to take Dobby Downs apart, this is all I managed. Does anyone have ideas as to how I might be able to remove the remnants of wallpapering? The previous owner had wallpapered the walls and floors using some kind of really strong glue and they won't come off. I think they've used the same glue on the house because these bits don't come apart. Ideas?


Portaat ja niiden kaiteen sain irti. Tuohon portaiden alle tulee Oljon kotikolo:

I did manage to pry off the stairs and the banister. I'll be making a cupboard under the stairs for Kreacher:


Samantyylisen kuin Harrylla Viisasten Kivessä:

Something like the one Harry had in The Philosopher's Stone:


Nukkekotiblogeissa on viime aikoina esitelty työpisteitä. Monilla on ihania työhuoneita, joita rakastan kuolata. Mulla on vaan tämmönen nurkkaus olkkarissa:

Some blogs have of late featured the work spaces of miniaturists. Some have the most amazing crafts rooms that I love to drool over. I only have this nook in my living room:


Nämä työn alla olevat projektit ovat siellä täällä olkkarissa nekin. Niitä on lisää makkarissa :D Olisipa työhuone!

These projects that are under construction are in the living room as well. More can be found in my bedroom :D I wish I had a separate dollhouse room!


Saturday, February 9, 2013

Hedwig House suunnitteilla - Planning Hedwig House

Olen tässä katsellut ja mittaillut noita kirpparilta löytämiäni nukkekotiosia ja mietin josko niistä tosiaan pykäisi Hedwig House-nimisen talon (Ginevra Cottage sai alkuperäisen nimensä takaisin, se sopii sille paremmin). Jotenkin se tuntuu turhan fiiniltä Griseldalle, mutta saakon täti sen. Ainahan hää voi muuttaa jos joskus tulevaisuudessa löytyy joku hälle sopivampi :)

I've been measuring the dollhouse parts I found at the fleamarket and I think I will build a house, named Hedwig House (Ginevra Cottage got it's original name back, it suits it better), around them. It seems a bit fancy for Griselda, but she'll get it. She can always move if she finds something more appropriate one day :)


Nuo kaksi ovellista etupaneelia on varmasti eri taloista, mutta tuumasin että siitä voisi tulla kiva näin - tuo toinen ovi vois olla keittiön oma sisäänkäynti :)

The two front panels that have doors are probably from separate houses, but I figure it might look nice like this, with the side door as a kitchen entrance :)


Uusi Dobby Downs - A new Dobby Downs

Tässä uusi Dobby Downs, joka sekin tosiaan löytyi vitosella ja olikin lopulta ilmainen - pakkohan se oli ottaa, varsinkin kun itselläni oli muksuna samantyylinen Lundby ja olin kerennyt haaveilla, että olisi hauskaa tehdä sellasesta jokin vähän epä-Lundbymainen projekti.

Here's the new Dobby Downs, it too cost 5 euros and ended up free of charge - so I had to have it, particularly since I've had a similar Lundby as a kid and had been thinking that it'd be fun to turn a Lundby into a little bit of an un-Lundbyish project.


Edellinen omistaja oli tapetoinut  seinät ja lattiat.

The former owner had wallpapered the walls and floors.


Edellinen omistaja oli myös tehnyt uuden katon, ilmeisesti laminaatista. Ensin ajattelin ottavani sen pois, mutta kaavailen tuohon olkikattoa (tekoturkiksesta kenties), joten ehkä se voi jäädä siihen alle korkeutta antamaan. Kahtellaan.

The former owner had also fitted a new roof on, from floring I think. At first I thought I'd take it off, but I'm planning a thatched roof (perhaps out of faux fur), so maybe I'll leave it to give the thatching some height. We'll see.


Aloitin jo tapettien poiston, paikoin alkuperäiset pinnat kurkkivat esiin. Tästä tulee useamman kotintontun yhteinen koti. Visioin rappusten alle komeron, jossa asuu talon vanhin kotitonttu, joka ei perusta moderneista hömpötyksistä vaan asuu vaatimattomasti rappusten alla, koska sitä hirvittää sellainen luksus kuin oma talo tontuille. Ja kuten vanhus narisevalla äänellä sanoo "jos porraskomero kelpasi nuorelle Harry Potterille, kelpaa se totta vie vanhalle kotitontullekin". Lisäten julkeudestaan kauhistuneena: "ei niin että minä vertaisin itseäni suureen Harry Potteriin!!"

I've started to remove the wallpaper, the original surfaces are showing through here and there. This will be the home of several house elves. I have a vision of a cupboard under the stairs, where the eldest house elf lives, as he doesn't hold with the new fangled ideas of elven rights, let alone something as extravagant as a whole house for house elves. As he says in his quivering voice, "if a cupboard under the stairs was good enough for a young Harry Potter, it's certainly good enough for an old house elf". Adding, shocked by his own audacity: "not that I'm compairing myself to the great Harry Potter!!!"


Keittiön ovi puuttuu, mutta eipä siihen ovea kaivatakaan.

The kitchen door is missing but that's just as well, I think it's better without it.


Tuesday, January 29, 2013

Rookia rukkaamassa - Raising the Rook

Pitihän se arvata. Löysin Griseldan tyhjästä Marvolo Manorista yllyttämästä taikayhteisöä kapinaan - palopuhe oli niin kiihkeä, että Ginnyllä nousi hiukset pystyyn! Ei auttaneet mun selittelyni 1:1 kiireistä, nyt vaadittiin vähän miniäksöniä!

I should've known. I found Griselda in the vacant Marvolo Manor inciting the magical community to an insurrection - her rhetoric was so fiery, it set Ginny's hair on end! My feeble explanations of a busy 1:1 life fell on deaf ears. Mini action was demanded!


Koska Voldemort on harvinaisen suostuttelukykyinen ("Kidutu!") päätin alottaa Riddle's Rookista. Se on projekteista pieninkin, joten kynnys siihen on matalin. Ja voi elämä mikä tohelo olen, ollappa pöytäsaha! Kesti nimittäin ainakin pari tuntia sahata sopivankokoiset palat Rookin kolmannen kerroksen seiniä ja kattoja varten... pikkuruinen käsisahani veti alvariinsa vinoon ja lopulta alotin alusta tavallisella käsisahalla. Joka tapauksessa, nyt on osat vihdoin sahattu.

Since Voldemort is particularly persuasive ("Crucio!") I decided to start with Riddle's Rook. It's the smallest of the current projects too, so easiest to brave. But lord what a klutz I am! I wish I had a table saw! It took at least a couple of hours for me to saw pieces for the Rook's third floor's walls and roof... my tiny handsaw kept veering off so I couldn't get a straight line and finally I ended up starting over using a regular handsaw. At any rate, now the walls and roof are ready for installation.


Onnettoman sahaussession jälkeen en luottanut taitoihini koota kolmatta kerrosta, joten siirryin suunnittelemaan Rookin takkaa, josta tulee iso, jotta sen kautta voi matkustaa hormiverkostossa. Suhersin takan pääpirteet ruutupaperille ja sitten hiilipaperin avulla pahville, sillä halusin ensin tehdä takasta pahvisen version, jota mallata paikoilleen helppoa hienosäätöä varten.

After the pathetic start I didn't trust myself to put together the third floor and started in on the Rook's main fireplace instead. It needs to be really big to allow for travel through the Floo Network. I sketched out the basic dimensions on grid paper and then transferred it to cardboard using carbon paper. This because I wanted to make a rough cardboard template of the fireplace before making the final version, so I could try fitting it into the Rook and make alterations as needed.


Tässä pahviversio takalle osotetulla paikalla. Voldemort hoputteli kylmästi lopettamaan viivyttelyn ja ryhtymään tositoimiin.

Here's the template in the spot where the final version will stand. Voldemort coldly urged me to stop procrastinating and get to it.


Meni silti vielä hyvä tovi kun pähkäilin mitä materiaalia käyttäisin. Pahvi tuntui liian heppoiselta, saha repi vanerin rumasti ja osa vanerista oli vääntynyt. Lopulta otin vanhan kehyksen taustan, mitä lie lastulevytavaraa, jotain vanerin ja tosi jäykän pahvin väliltä, ja siirsin taas takan ääriviivat siihen hiilipaperin avulla.

It took a while for me to decide on the material for the fireplace though. Cardboard felt too flimsy, my saw tore up the plywood and some of it was warped to begin with. Finally I grabbed the back of an old frame, some kind of woodlike stuff somewhere between plywood and stiff, thick cardboard. Out came the carbon paper again as I used it to trace the silhouette of the fireplace onto the "wood".


Tässä tulos. Parasta olis ollut keskittää toi kuva niin, ettei sen kohdalle olis osunut noita reikiä, mutta lykkäsin sen levyn laitaan koska saha ei toiminut tuon matskun kanssa ja askarteluveitsellä kesti ikuisuuksia kaivertaa takka irti levystä ja näin säästin vähän vaivaa. Minäkö laiska ;)

Here's the result. The best thing would've been to center the scetch to avoid those holes, but my saw was not good for this material and it took forever to carve it out with an X-acto knife and this way I saved some time and bother. Lazy? Who, me? ;)


Tähän jäätiin, takan runko hyvällä alulla.

This is where I left off, more tomorrow.